Showing posts with label recipe. Show all posts

Saturday, January 3, 2015

Taquitos


When I was a kid, I used to love getting flautas from the Mexican restaurant down the street.  Corn tortillas, stuffed with meat, wrapped into little cigarette-type rolls, deep fried, usually served with guacamole.  So good.   

After we got married, the husband and I got hooked on the ease of taquitos.  Basically the same thing, but not fried up to order.  Straight from the freezer to the oven.  Taquitos and potstickers became the basis of the infamous “Crap Dinner” we would indulge in about once a month.  Just like it sounds, this meal is rooted in junk food and usually resulted in two days of drinking water to account for the amount of sodium we had ingested.

Taquitos are still one of our favorite easy dinners.  I’ve gotten more and more disappointed in the taquitos that you can buy in the store, especially as I constantly consider the ingredients vs. homemade and the cost of prepared foods vs. making it at home.  I still do a ton of crock pot and make ahead meals due to Little E’s crazy riding schedule.  I was reading Jessica Fisher’s Not Your Mother’s Make-ahead and Freeze cookbook from the library the other day and was inspired by her frozen taquitos recipe.  I hadn’t considered making them at home. 

I hesitate to even claim that I have a recipe for taquitos because I tend to use it as a Use-Up-The-Leftovers food now.  Leftover roasts, chicken, and such all go into the freezer until I have enough to make taquitos although occasionally, I’ll make something specifically for taquitos – like a venison roast.  Drier veggies make good additions – corn, peppers, potatoes, rehydrated or oil cured dried tomatoes.   Cilantro holds up well too.  The only thing we have not really cared for has been cheese – the cheese doesn’t hold up well and melts away long before the frozen taquitos are done.  I just tried some with feta, and it held up a little better, but generally not worth the calories, as far as I was concerned.   In terms of seasonings, again, you don’t want your filling to be too moist – the tortilla will get too wet on reheating and fall apart.  That said, a little barbeque sauce or adobo sauce adds a lot of flavor.

Because frying all the tortillas takes some time and makes the house a little smelly, this is not something I make unless I’m willing to commit the time and energy to make a big batch.  I rarely make just one filling.    I’d say altogether it probably takes me an hour to an hour and a half to make 60+ taquitos (that's two small bags of tortillas), depending on how organized I am.   And just in case you were thinking about skipping the whole frying step – don’t even consider it.  Corn tortillas are difficult to work with, and the pre-frying step will make sure they cook up properly once frozen. 


 Make-Ahead Taquitos with Filling Ideas 
Yields: 8+ Servings

Ingredients
1 cup Oil May need more depending on pan. Not olive oil - you want something with a high heat point
2 bags Corn Tortillas
-- FILLINGS --
-- BBQ Pork --
1 1/2 cup Leftover carnita/roast pork
1/4 cup Finely chopped onions
1 tblspoons Cilantro
1/4 cup Bbq sauce Enough to moisten
-- POTATO CHORIZO --
2 Potatoes
1 Sweet potato
2/3 cup Fresh chorizo (can use Spanish chorizo, use about 1/2 cup, finely diced)
1/2 cup Feta Cheese (if desired)
-- CHICKEN AND BLACK BEAN--
2 cups Cooked, shredded/chopped chicken
1 can (12 oz) Black Beans
1/4 cup Salsa Use just enough to moisten filling - don't want filling to be wet
2/3 cup Frozen corn
-- BEEF or VENISON AND GREEN CHILI --
2 cups Roast Beef or Roast Venison
1 can (small) Green chili
1/2 cup Finely chopped onions
1/2 cup Frozen corn (optional)
Instructions
Prepare desired fillings by mixing ingredients together. If using a sauce (like bbq or salsa), use just enough to make the filling moist, but not wet. Season with salt/pepper/garlic as desired.

Prepare tortillas - using a large skillet, heat about an inch of oil to shimmering. Fry tortillas, 1-2 at a time for about 10-15 seconds on each side. Tortillas should not brown at all. Do not skip this step. Drain on paper towels.

Once tortillas are cool, spread about 2 tablespoons of filling on one edge of a tortilla. Roll up tightly, like a cigarette. Secure with a toothpick. Repeat. (I usually can get 2-3 on a toothpick). Lay out on a cookie sheet to freeze (if you are good, you'll remember to take the toothpicks out when the taquitos are slightly frozen but still flexible enough to remove the toothpick. Otherwise, you can just leave them in and even cook them with them in). Once frozen, package off into smaller bags or vacuum seal.


Monday, December 29, 2014

Pasta Maker with Quick Red Sauce

My husband got me a beautiful set of Shun knives for Christmas.  Beautiful and so very sharp.  In fact, I sliced the couch accidentally while I was unwrapping them and putting them away (I may not ever hear the end of that). 

With that purchase, he got a credit back to Williams-Sonoma.  Add in the gift card I received, and we had a handy little amount to spend.  I don’t usually shop there – it’s very expensive, but I do love to walk through it. 

I had my eye on some attachments for my KitchenAid mixer – I don’t have a single attachment, and I thought it might be fun to get a pasta maker attachment.  I have a hand crank pasta maker, but it’s a pain in the ass.  I’m willing to spend a lot of time of weird cooking stuff (obsession with springerle?) but pasta – ugh.  The constant kneading and rolling and re-rolling and re-rolling before you can even cut it… And then the cleaning and picking out little bits of dried pasta for the next two weeks. It’s too much for me. 

Anyway, the lady at W-S really spoke highly of the Philips Pasta Maker as opposed the KitchenAid attachment.  I have never heard anyone gush over a product like this.   And when I did a quick check online, just about all the other reviews of it also gushed over it. 

It’s a pretty cool machine – just put in your ingredients and in 15 minutes, you have fresh pasta.  My one complaint is that it only has 4 shaping discs – spaghetti, fettuccini, penne rigate and lasagna (which can be used to make ravioli and dumplings).  Apparently, if you live in Australia or Asia, you can get udon, ramen, angel hair and a tagliatelle.  The recipe book that comes with it includes recipes for the other discs.  It’s pretty cruel, as far as I’m concerned.  I’m still considering whether it’s worth the $60 shipping fee to get a $20 part.  

Now… the fun part….  My husband arranged for an impromptu dinner party with a couple friends.  I know you aren’t supposed to try something new like this when having a party, but I figured it would be fun for everyone.   Six adults, five kids – we’d see how this thing would work.  I made a quick red sauce and a quick white sauce (wasn’t sure what the kids would eat) and grilled some sausages and a chicken breast for protein.  Bob (my starter) provided another loaf of bread and my girlfriend brought a salad.  Didn’t have time to make dessert, but we still had plenty of Christmas cookies. 

Oh. My. God.  I doubt I will ever buy pasta again.  It was perfect.  Delicious.  And done in 10 minutes.  We made two large batches of spaghetti and it was probably a little tight – I could have made a third small batch.  And I say this primarily because I woke up this morning wondering if there was any pasta left because I really really wanted some for breakfast.  But alas, we ate it all last night.

 And the topper on the thing – it was a breeze to clean.  Even I could take it apart and clean it.  No teensy tiny parts to lose.  Fantastic.

Tonight, I am going to try Food52’s Spicy Ramen Express Recipe with Harold McGee’s Alkaline Noodles (although I may cut the semolina with a bit of AP flour).  

 
Last Minute Red Sauce

Ingredients
1 large Onion Very finely diced/processed
3 tablespoon Butter
1 can (8 oz) Tomato Paste
1 can (12 oz) Tomato Sauce
1 large can Tomatoes drained
1 small can Tomatoes drained
1/2 cup Wine/water can use red or white
1 tablespoon Spices (Basil, Bay, Oregeno, parsley)
4 cloves Garlic crushed
to taste Sugar Usually pinch to 2 tbls
1/4 cup Shredded italian cheese (parmesan or a mix)
2 tablespoon Butter

 
Instructions
Saute onion in butter until very soft. Add tomato paste, tomato sauce, both jars/cans of tomatoes and wine. Break up tomatoes if whole. Add in spices if dried to taste. Let simmer for 20 minutes. If using bay leaves, take them out now. Taste sauce - may need a little sugar, depending on wine used and tomatoes and how sweet you like it. This is also the point to adjust texture - if you like your sauce smooth, stick an immersion blender in it.  Otherwise, leave it chunky.  Stir in garlic and cheese. Let simmer for as long as you need. Shortly before serving, taste again, adjust spices. Finally, stir in the last two tablespoons of butter, mix well into sauce.


Yields: 6-8 Servings


Saturday, January 21, 2012

Krispy Pops

Miss Thing has a July birthday.  While there are many benefits to having a summer birthday, there are a few fallbacks as well.  For those with a summer birthday, there is not the same excitement of having the whole class sing happy birthday, of the special birthday treat, of having that "special day" with the entire school. 

Fortuntely for those with a summer birthday, it means that you have a winter half birthday.  Now, I admit that I have not always been the most diligent mom when it comes to half birthdays.  I'm pretty sure I remembered last year to bring something in.  But I think that was my first time.

This year, Miss Thing requested that she can bring in a treat, so how could I refuse?  Her classroom is a restricted one - no nuts, no eggs.  I've been using my "crazy cake" recipe (no eggs, no dairy) cake for so long for her school events that I'm getting tired of making it.  Let alone I have dug myself into a bit of a hole with the complex constructions of some of my previous cakes.

So this year, it was something simple.  Rice crispy treats.  Sticks.  Chocolate.  Sprinkles. 


Start with your basic rice crispy treat.  I try and pack them down a bit as well.  You want some strength to your treat.  Then, spread a thin coat of chocolate on the back for structure and strength.  Homemade rice crispy treats can get a little flaccid or bendable at times.  You do not want that in a pop.


 Now, about that stick....  Rice crispy treats are not exactly the most stable, and while a stick should stay in, it is best to apply reinforcements.  Before placing that stick in the rice crispy treat, go ahead and dip it in chocolate first.  That way, the stick will be cemented inside the treat.


Drizzle the other side with more chocolate and top with sprinkles.   A sugar filled treat fit for a princess.  On a stick.  


Monday, June 15, 2009

My new favorite squished potatoes...

As a child, we had potatoes with just about every meal. I chalk a lot of this to my paternal grandmother's immigration from Ireland, and her subsequent influence on my father. A meal was not complete without a potato of some kind. I remember my grandmother visiting us, and accompanying our meal of spagetti, we had... potatoes. Her idea of health food was a McDonald's fried fish sandwich and a large order of french fries.

Potatoes have always been a symbol of comfort and stability for me. I could eat them every day, in varying forms. Unfortunately, I can also eat way too many of them - somehow the section of my brain that says "stop eating" turns off when potatoes are around. Like other things that accompanying getting older, I am trying to limit my consumption of starches - not for some Adkins like diet thing, but just an acknowledgement that I can't eat as much of them (or anything) anymore, and I don't feel particularly good when I do.

But there are still days that I crave potatoes. I love french fries (the way my dad used to make them), but fried food is a big no-no. I used to make over roasted french fries, but I always have had problems with them sticking to the pan or foil. It's like the raw potato starch solifies and sticks so you can't turn the potatoes to get them evenly browned. Maybe I'm the only one who ever has this problem.

My inspiration came after reading a recipe for mashed, roasted potatoes. First, boil the potatoes, THEN roast them. Given, you're not going to be able to cut them into those little french-fry strips, if that's what you're craving, but I am in shock and awe of how much better the potatoes turn out.

First, scrub some red-skinned (or other waxy type) potatoes. Boil them in enough water to cover until a fork pierces the potatoes easily. You want the potatoes to be pretty tender because you need to be able to squish them with a fork.

Next, spread them out on a baking sheet lined with aluminum foil, and use a fork to gently squish and break up the potatoes. Now, I like lots of little crunchy pieces, so I break them up quite a bit. Drizzle with olive oil (or a butter/olive oil combo if you're feeling really daring), salt, and maybe garlic if you are so inclined. You want all the pieces to be coated.


You're going to look at the pan (above) and think, 'This is going to turn into a goopy sticky mess' , but I swear, it's not.

Bake at 400 or 450 until the potatoes are as crispy as you like. All those little bits will become like little potato croutons. Because they have been pre-cooked, the insides are fluffy and tender, but the outsides and skins are so crispy.

Serve them with ketchup or aoli, or I even use them in my potato salad now. I also like to serve them as a tapa (potato bravos)...

Thursday, May 14, 2009

Peanut Butter

I have been making peanut butter at home for about three years now. After Whole Foods came into our neighborhood, we fell in love with the fresh ground honey roasted peanut butter that you pay an arm and a leg for but grind it right there in the store.

It didn't take long for us to try it at home. The result was just beautiful. Slightly bumpy (a food processor can't get grind it completely smooth), fresh smelling, never separating into that oily goop like the natural stuff you buy in the store, and slightly sweetened because we still use the honey roasted peanuts.

When I mention that I make my own peanut butter, people get that glazed look on their face. You know that look: The "Oh. You're one of THOSE weirdos who sew their own clothes and raise their own chickens and don't use deodorant and sing songs around a guitar instead of watching Make Me a Supermodel like the rest of us" look. Well, I would raise my own chickens if I could, but I'm really liking Salome and the hot guy from England and I hope one of them takes it all.

The thing is, it is so.damn.easy and cheap for that matter, it doesn't make sense not to make it anymore. It lasts forever and it tastes so much better! And it takes approximately 8 minutes to make. I timed it.

So, I'm sharing my peanut butter strategy with all of you. I encourage you to run out right now and try it.

First, get yourself a big ole can of honey roasted peanuts. You can use plain roasted peanuts, but DO NOT use dry roasted. I'm not sure why, but they are not as oily and do not develop the butter texture. No matter how long I ground them, I ended up with just crumbly peanuts. I now go to one of those wholesale stores and just buy a case of the huge tubs of peanuts so we don't have to worry about running out.

Add those peanuts to your food processor, about 1/2 to 3/4 the way up the bowl.

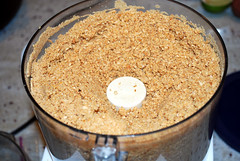
Next, start the processing/chopping of those peanuts. At first, your peanuts will look like, well, chopped peanuts.

pb1


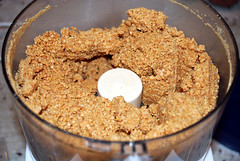
Keep the processor running. At the next stage, your peanuts will start to clump together. They are starting to extrude oil, and you'll notice that there are little clumps at the bottom of the processor, and it may even clump around the top. This is a good time to get a spoon and start breaking it up a bit. Keep processing.

pb2

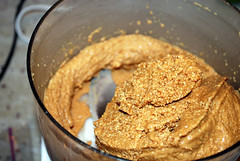
The next stage is when the peanut butter is really starting to come together. There will be some areas that look like peanut butter, but it's still really chunky. Stir it up a bit again, and keep processing.

pb3

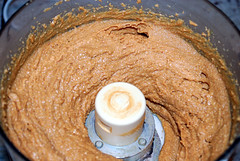
About another minute or so into the processing, and it's really going to start looking like peanut butter. You're going to look at it, taste it, and cry out with pure joy and consider all the things you could do with this sticky elixer from the gods. But don't stop now. The picture below really looks like peanut butter, but I strongly encourage you to keep processing for about 2 more minutes. If you stop now, the peanut butter may firm up substantially in the fridge (which is where I keep it, just to be safe) making it nearly impossible to spread on that squishy white bread your child so desires. Trust me. Let it go. Stir it up again. Process for about another 2 minutes.

pb4


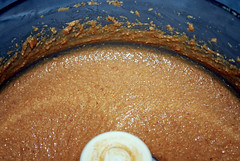
Finally, your peanut butter should look like this:

pb5

See how it's no longer holding a line? You may think it looks a little runny, but once it is away from the heat of the food processor, it will firm up. It's done now.

Finally, give a taste to your child who has been begging for some peanut butter since you started making it.

pb6

And there you have it. I was told as a child that eating peanut butter alone was one of the most dangerous things you could do since the Heimlich doesn't work on peanut butter. So please don't turn me in to Child Services.

Friday, June 27, 2008

Home alone..... fermenting...

I went to New York City for a few days with my mom and sister on a celebratory girls trip. It was a first time there for my mom and sister, and my second visit. New York feels like a potential second home to me. However, much like some of my other favorite cities, the cost of living seems so outrageous compared to the midwest, that it just seems more sensible to live here and then go on visits as often as possible.


While I was gone, my urn of sauerkraut was happily bubbling away. What? You made sauerkraut, you say? Well, not yet. Sauerkraut is cabbage that has fermented in a brine. Much like a pickle. I guess it takes about 4 to 6 weeks for the cabbage to fully ferment to its fully gasous self. Being a good irish girl like I am, I came rather late to the sauerkraut game, but my german husband (and this highly german town that I live in) loves the stuff. And I like it too. It seemed natural to try to preserve it myself.


I secured 3 cabbages (15 pounds) at the farmers market the previous weekend. (on a side note, my new market bag worked fabuously - it was like having 3 ginormous... well, for lack of a better analogy, testicles popping out of this bag). Sliced them thin, and sprinked them with salt. 3 tablespoons of salt per 5 pounds of cabbage. Let it wilt from the salt. Pack the cabbage into the urn tightly. Hopefully, the liquid from the cabbage will cover the cabbage, but if it does not (and I have yet to have the water extruded actually cover it), you can make a simple brine to supplement it.

At first my sauerkraut bubbled like crazy and almost immediately started eminating that "Dear god, what has died in our kitchen" (to quote my husband). I shuffled the enormous crock of kraut down to the basement for fear that the hot weather was encouraging too fast of fermentation.

Then, after a week down in the basement, I think it was too cold. The fermentation seemed to cease.

Thank you to the Harvest forum at Gardenweb - a group of experts on such preservation who advised me to bring it back up into warmer environment.

It's been going for 2 weeks now. The kraut is not bubbling as much as I think it should, but it is definitely starting to smell and taste sour.

I'll update later...

Sunday, April 13, 2008

In a pickle...

Since I started canning last summer, I have become very interested in pickles. We are big pickle eaters around here. I'm a dill pickle girl myself, with no real taste for sweet or sweet and sour pickles.

I decided that the smell of fermenting cucumbers or cabbage might not be the most appealing when one is trying to sell one's house, so I've been toying around with the idea of brining some pickles and/or cabbage since we moved into this new house. Last autumn, I bought some cabbage from the farmers market with the full intention of making saurcraut, but didn't get to it fast enough.

I saw some pickling cucumbers at the market these past two weeks. Last week I pickled some cucumbers in a vinegar solution. "TOO SOUR" exclaimed Miss Thing making that scrunched up face that animated characters do when they eat lye or a lemon. I knew a brining was in order.

Last Sunday I followed Alton's recipe for cured pickles. I can tell you that those cucumbers just looked beautiful.


I checked on those pickles this morning, with the full intention of seeing those little bubbles that indicate successful fermentation is taking place. Nothing.
The water that was once clear is now a little murky, but not cloudy as I expected it to be. Now, it's only been three days. And maybe I'm not sure what I'm looking for. It's also been rather cold in my house (damn this never ending winter), so we'll give a few more days before I decide this is a failed experiment.

Wednesday, March 26, 2008

Anise 1, World 0

I thought I would reflect a bit on my most recent holiday Feast.

Black licorice. I don't know anyone who likes it (except I think my mom likes it). I remember eating pizzelles that were heavy on the anise flavor and just gagging with disappointment that the crisp delicacy had been poisoned with that flavor. At one of my favorite college coffee shops, I used to pick the anise seeds out of the rock-hard biscotti that I would eat (one piece would last a whole week. I hope to write about that later). I still don't care for italian sausages that rely heavily on fennel seeds for flavor.

Then about three years ago, I bought a little french taragon plant, and I fell in love. For some reason, tarragon's mild anise flavor seemed so much more delicate, so gentle. Nothing at all like the harsh explosions from anise seeds. I started using it in everything. I made a tomato-tarragon spread that I use on bagels and crackers. People can't place the taste. (I even took the plant with me when we moved up here. It overwintered successfully, and I almost wept with joy - I hope it makes it to planting).

My secret mission for the past two years has been to try to make anise more accessible. My biscotti, although edible without a jackhammer, uses a mixture of anise, vanilla and almond. I couldn't think of it without the slight anise tinge. I experimented with springerle this past christmas season with a heavier anise flavor. Again, even those who profess not to like anise ate the cookies.

However, I have not been able to move past to fennel. Inevitably, someone sees it, and turns their nose up. Two years ago at Thanksgiving, I made a mixed greens salad with fennel, orange and onion. No one touched it (now, this could also be in part because I made WAY to much food. Two 15 pound turkeys for 12 people? WTF was I thinking?). I would buy it, and Mr. H would just shake his head.

"Trying again?"

"Hell yes."

I am happy to say, that this Easter, fennel won. I made a potato-leek-FENNEL gratin. And one of the cousins asked for the recipe. Now, you have to keep in mind that most of my family considers things that don't come with a powdered cheese sauce gourmet. And I don't mean that in a disparaging way, but more as a description of their context. I usually joke about the ingredients I'm sneaking into the meals. I love sharing things that my family hasn't seen or tasted before. I gave my step-mother-in-law her first taste of blood orange this weekend, and I just loved seeing her face at the different taste. Anyway, I digress....

The gratin was really tasty. Sure, you couldn't really taste the fennel that much. And it was covered in heavy cream and cheese. But the fennel DID add something to the dish, and I wouldn't leave it out...

Potato-Fennel Gratin (based on the recipe from epicurious)

2 tablespoons (1/4 stick) butter
3 chopped leeks (white and pale green parts only)

2 medium-size fresh fennel bulbs, sliced very thin
About 3-4 large red-skinned potatoes or other waxy potato, peeled, thinly sliced (2 lbs?)

3 cups grated Jarlsburg cheese

1 cups chicken stock or canned low-salt chicken broth
3/4 cup whipping cream


Preheat oven to 375°F. Butter a large glass baking dish (mine was a little larger than a 13x9). Melt 2 tablespoons butter in large nonstick skillet over medium heat. Add leeks cook until tender, stirring occasionally, about 10 minutes. Remove from heat.

Layer potatoes so they cover the bottom of the dish. Sprinkle layer with about 1/2 of fennel and 1/2 of leek mixture, follow with 1/2 of cheese (you're going to end up with about three layers - top layer being potato). Layer potatoes on top of the cheese, repeating the previous fennel, leek and cheese layers. Top with a layer of potatoes. I was dangerously close to the top of the gratin at this point, so I pressed everything down.

Heat cream and chicken broth and pour over potato mixture. The liquid will come close to submerging the top, but probably won't submerge the top layer. I pressed down the potatoes so they got some moisture on them, but wasn't terribly concerned. Several people had reported that there was too much moisture in the original recipe, so I cut it back and just kept an eye on it.

Bake for about an hour or so or until the top layer is golden brown. As it cooks, the potatoes should shrink a little, and the liquid covers them. If not, add a little more cream-chicken broth liquid to them. You don't want too liquidy of potatoes.

Sunday, March 2, 2008

My first pate


There are a lot of people who don't like liver. I suspect it is because there are a lot of people who have never tried liver. As a child, I remember my irish-immigrant grandmother used to order liver and onions if available (that is, when we weren't eating at McDonalds which along with it's never ending supply of fish sandwiches seemed to represent to her all that was good with this country America). I remember my aunt making pate for special occasions - big bowls of the brown squishy stuff slabbed on crusty bread. All the adults ate it. I don't recall liking it back then, but I used to like the smell of it. Earthy and meaty.

Mr. H's grandfather used to make liver and onions as well, and regale with great horror stories of the smell of liver and onions in the house. I never thought it smelled that bad, but I always liked onions.

In Las Vegas one year, I ordered an appetizer of duck ravioli served on seared foi gras at Sensi (don't hate me for the foi gras). Mr. H recoiled at the idea, but I asked him to try one bite. His eyes lit up, and marveled at the texture and taste. He practically ate the whole thing. Over the next few years, I have gotten him to try pate as well. He likes it, kind of (grumpily mumbling "not as good as foi gras") and not enough to cook it at home, so when we had an improptu get together this weekend for a few friends, I ventured to make my first pate. I had it on good authority that at least one other person liked pate, so I was hopeful that it might get consumed.

It was fairly easy to make, and the liver did not smell up the house when cooking (one of my biggest fears. I was concerned that I might throw Mr. H into a full-fledged psychotic breakdown re-living childhood memories of beef liver). It was also well-recieved. I thought it had a bit more of a "liver" aftertaste than I usually like. Plus, it's so damn rich, you can't really eat much of it. The eight of us ate about a quarter of it. I split it into two crocks, so I hope to freeze the other one.
My final rating: Good, but I'm not sure it's worth the calories. So few people actually like liver, and many won't try it because it IS liver, or like my mom, can no longer eat liver due to health reasons. I have a reciped for a lentil pate that tastes remarkably like the real thing, so I'll probably stick to that from now on.

The original recipe came from Epicurious. The below contains my modifications.

Liquored up Pate

1 1/2 sticks (3/4 cup) unsalted butter
1 medium onion, chopped
1 large garlic clove, crushed
1 teaspoon minced fresh thyme
1 teaspoon minced fresh sage
1 tbls minced fresh parsley (plus some for garnish)
3/4 teaspoon salt
1/4 teaspoon black pepper
1/8 teaspoon ground nutmeg
1 lb chicken livers, trimmed (I wish I knew what you were supposed to do to trim the liver. That will be my next step)
2 tablespoons whiskey (because I didn't have bourbon)
1 tbls Port wine (because I have a whole bunch of Port)

Melt 1 stick butter in a large nonstick skillet over moderately low heat, then cook onion and garlic, stirring, until softened, about 5 minutes. Add herbs, salt, pepper, nutmeg, and livers and cook, stirring, until livers are cooked outside but still pink when cut open, about 8 minutes. Stir in bourbon and port and remove from heat. Purée mixture in a food processor until smooth, then transfer pâté to crock and smooth top.

Melt remaining 1/2 stick butter in a very small heavy saucepan over low heat, then remove pan from heat and let butter stand 3 minutes. Skim froth from butter, then spoon enough clarified butter over pâté to cover its surface, leaving milky solids in bottom of pan.

Chill pâté until butter is firm, about 30 minutes, then cover with plastic wrap and chill at least 2 hours more. Garnish with additional parsley. Serve with mustard, and those little french pickles.

Monday, February 25, 2008

Salad days part 1

During the summer, I gorge on fresh veggies. I could eat them roasted, grilled, raw whatever. Winter months bring sadness and gloom to me because there are so few fresh veggies available. (Yes, I know they bring them in, but once you get used to eating tomatoes from the summer months you can not touch one of those hard nasty tasteless things they stock on the shelves). I try to compensate with a lot of salads.

These salads become especially important when I look at the calendar and realize that we only have a few months until the days of baggy sweaters and jeans will vanish with the snow. I lost about 40 pounds a few years ago and I am still fearful of putting it back on again. Winter is particularly tough since it's harder to justify walking around the neighborhood when you are knee-deep in snow.

Anyway, back to the salads. We eat two core salads in this house - a caesar salad and a mixed greens salad. And it's really more that we have two core salad dressings, and the salad revolves around that.

Make salad dressing is such an easy thing. It does take a little longer than pulling a bottle out of the fridge, but the results are so much tastier, and I control what I'm putting into it. I have tried making a larger portion of salad dressing a couple days in advance, but have found that it loses too much of its flavor, so we're back to making it immediately before dinner.


Tonight's dressing is a honey-citrus-mustard dressing. It's very, very simple. It works best with mixed greens or something slightly on the bitter or tart side to compliment the sweetness from the honey. I probably wouldn't serve it on romaine or head lettuce.


Citrus-Honey dressing

1 clove garlic, crushed

1 tbls dijon mustard

1 tbls honey


about 3 tbls to a 1/4 cup citrus juice- we frequently use lime because it is what we always have in the house. I really like it with lemon, or even a lemon-orange mixture.


Mix the above together well.


Take a good bottle of olive oil and slowly drizzle it into the juice-mustard mixture, stirring constantly. An emulsion should form. I'm not quite sure how much olive oil I put in. It's not a whole lot.


This dressing is a re-creation of one I had down on a mixed green salad at Enormous U served with roasted veggies and cumin spiced black bean hummus (super, super good - I highly recommend the combination) . We also eat it with the above salad - mixed greens, onions, sundried tomatoes, sea salt and pepper. And homemade croutons.

Monday, February 18, 2008

Dinner Club - Appetizer Edition...

In an attempt to meet some people in our new neighborhood, I signed the poor, unsuspecting Mr. H and myself up for a dinner club. Although I am a bit of an introvert, Mr. H. loves a random social engagement, and could quite possible entertain anyone on his own for several hours.

Our job was an appetizer. When I spoke to our most gracious host to inquire what she was making so I could coordinate the appetizer, she replied "a meat." So, assuming that she had not settled on the main dish yet, I was left to my own devices. Which, for the first time, I could not come up with a damn thing. It's not like me not to know what appetizer to bring. I totally love appetizers. But we had some considerations - because we were going to someone else's house, it needed to be portable, able to travel easily, not needing to be cooked and immediately served.

So I tried something new that I found on the Epicurious web site - dates stuffed with parmesan cheese and then wrapped in bacon. I'm rather unfamiliar with the whole date thing. I'm not a big fruit person in general. But I love parmesan cheese, and I liked the concept of the salty cheesey and the sweet date (even though I almost gagged when I tried a date by itself). And who doesn't like bacon? I could eat just about anything wrapped in bacon.

So here we go.

My first surprise was the need to pit the dates. I had never seen a pit from a date before, and was very surprised at how much they look like beetle larvae (unfortunately my picture of it did not turn out well).

After pitting them however, I had a gaggle of hungry little mouths like wrinkly pac-men.


Next, came the cheese. Little wedges of my good parmesan (you know, the stuff that has the crunchy crystalized salt or something in it - I love it. I really love it melted) shoved into these bad boys' mouths. I kind of felt like I was in Little Shop of Horrors and danced around the kitchen singing "Feed me Seymour".


Then, after squeezing the little mouths closed, wrap them in bacon (I partially cooked mine because it was thick-cut) and bake at 400 degrees until the bacon is crispy and golden.


This picture was taken before the final baking, but you get the drift. They were all that they were promised - gooey, sweet, salty and smokey. They were best right out of the oven, but they held up well on the ride over, and they were surprisingly almost completely consumed. I wasn't sure how they would go over. Even if you are a little concerned, give them a try!

Sunday, February 3, 2008

Pot-sticker soup


There are times when only soup will do. Maybe it is the weather, maybe it is because one imbibed one too many hurricanes at a certain Mardi Gras party the night before, but today both myself and Mr. H needed soup. Needed. Soup. Now

For us, today was a potsticker soup day. Clear broth seasoned with soy sauce and green onions, poured over potstickers and made as spicy as one could take. We fell in love with potstickers and buy them in bulk. They are an essential part of crap dinner. I have made my own potstickers, but they do not hold up well in the freezer, and they really fall apart when in soup, so I generally just stick with the pre-made ones.

Potstickers are little dumplings wrapped in a won-ton like dough that is then steamed and/or fried. When we are eating them as a meal (which we have done on several occasions), we boil them, then pan fry them. Which you can also do for this soup, because it gives them a nice crispy edge, but neither of us was feeling up to that much work.


Potsticker soup

8 cups chicken broth (I would have used my homemade stock, but I had used the rest on french onion soup *sigh*)
4-6 tbls soy sauce (to taste)
1-2 tbls rice wine vinegar (again, to taste - I like mine sour)
1 clove garlic, crushed (A small spoonful of garlic-ginger paste is also lovely)
splash sesame oil
(additional possible soup additions, based on what you have, and your tastes - 1-3 thinly sliced green onions, a couple thinly sliced button mushrooms, a little tofu, a handful of frozen green peas)

Mix together, and let simmer.

Meanwhile, prepare potstickers according to directions and your wishes.

Finally, plate the soup. Place 1 to 2 potstickers in a bowl. Pour broth over potstickers (this is important - you do not want to put the potstickers into your pot of broth - the wrapper will fall apart and lose all its dumpling-ness).

Top with whatever you have in the house - more green onions, bean sprouts, as much hot chili paste as you can handle

The King Cake


Our neighbors (and close friends) in C-bus throw a huge New Year's Eve party every year. Every year has a theme, selected around June. About three years ago, the theme was Mardi Gras. Wendy wanted a King Cake. I didn't know what one way, but I volunteered to make it.

A king cake is not really a cake at all, but rather an enriched bread (meaning sweetened, with eggs and butter), and then you may have a filling in it.

Historically, my understanding is the king cake is only served between the holiday of Epiphany (or 12th Night) and Fat Tuesday. It is shaped in a oval and covered in colored sugar: purple, green and gold. Inside the bread a trinket, traditionally a baby or an almond or bean is inserted. Whoever finds the trinket gets to bring the next king cake or throw the next party.

I'm not going to pretend that I that I'm an expert on the history or culture, because I live in the midwest and we don't really do the whole mardi gras thing.

Since that first one, I average about 6 or 7 each year. Mr. H loves them ("It's like a giant cheese danish!"), and they are a fun and impressive looking. I have tried a variety of fillings, from a plain cinnamon, to praline, and Mr. H's favorite, the cream cheese filling. I have made the cake with white icing and colored sugar, or as shown above with colored icing and colored sugar (I love the brightness of the frosting).

Last night, friends threw a Mardi Gras party in honor of the upcoming Fat Tuesday celebration. I brought a King Cake, and I finally think it was my best baby-hiding job ever. Mr. H couldn't find it after it was decorated. The best thing about being the one to make it is that you never have to worry about getting the baby.

The recipe I most frequently use is based on Emeril's recipe, although any enriched bread dough works just fine.

King Cake with cream cheese filling

First, the dough

2 packages dry active yeast
1/2 cup sugar
1 stick butter, melted
3 eggs plus 2 yolks
1 cup warm milk 4 to 5 cups regular flour
2 teaspoons salt
A dash of grated nutmeg

Combine the yeast, sugar, and milk. Let proof for 15 to 30 minutes. Add butter, and egg yolks in the bowl of an electric mixer fitted with a dough hook, and mix until combined. In a separate large mixing bowl, combine the flour, salt, and nutmeg. Add this mixture an batches to the yeast mixture.

Mix on low speed until it lightly comes together, then increase the speed to medium and beat until the mixture pulls away from the sides of the bowl, forms a ball, and climbs slightly up the dough hook. Dough will be smooth but loose - it's not as firm as some other doughs, and it may be just a bit sticky. Coat the dough with vegetable oil. Return the dough to the bowl and turn it to oil all sides. Cover the bowl with plastic wrap, set in a warm, draft-free place, and let rise until doubled in size, about 2 hours.

Next, make the filling

16 oz cream cheese (two packs, although I usually use about 1 and half pack), softened
1 cup powdered sugar
Splash vanilla extract
Splash almond extract

Mix well.

Now, fill the dough...

Turn the dough out onto a floured surface. Roll the dough out to about 30 inches long and 6 inches in diameter. Spread the cream cheese filling across the center of the dough. Bring the two long edges together and seal all sides completely. Using your hands shape the dough into a long cylinder and place on a greased baking sheet, seam side down. Shape the dough into a ring. You can put an empty can covered in aluminum foil and well greased the center of the ring to keep the definition and shape of the cake.

Let the dough rise again - about 45 minutes, until doubled.

Bake at 350 for 25 to 30 minutes. It will be golden brown. Let cool.

Once cooled, you can frost the cake. I like to use a powdered sugar glaze that has been flavored with a little rum and cream.

Sunday, January 27, 2008

Beef Turkey

It's not really beef turkey, but that is what the Marvelous Miss Thing calls it.

I love jerky, even though I'm not a big meat eater in general. I remember the first time I tried jerky. I was working in a family-run whole grain bread bakery. The bakers would come in at 2 am to start making the bread. By the time I got to the store after school, all the bread had been baked, and the bakers long gone. The store had this huge oven with shelves that rotated like a ferris wheel to bake the bread evenly. It was amazing, but it never really shut off (kind of like Lizzie, who always stays a little warm).

One of the bakers was also a hunter. When he had a successful season, he would make venison jerky on the off-day when they didn't bake. He would slide the pans into the oven, and it was my job to keep an eye on it while they dried. The whole back of the bakery would be filled with the smell of drying meat. It was fantastic.

I had never had jerky before, let alone venison (you want me to eat bambi?), so I was quite hesitant when he offered me that first slice. The first taste however, was so delicious - gamey, peppery, meaty. I was hooked. I used to sneak extra pieces out from the trays.

Since then, I have tried a lot of jerkies. The ones in the store are only good in moments of dried meat desperation. I have also tried several specialty outlets in the area. After eyeing the signs for Beef Jerky Unlimited we finally stopped for the first time last year (c'mon - a whole store of jerky? it sounded a little sketchy at first). They have a large selection of excellent jerky, including turkey and other game meats (although too expensive for my budget at the time). Also, Mom Wilson Sausage Mart on Rt 23 around Marion had good jerky. It's in the middle of no where, but a fun place to stop.

However, this past summer I purchased a dehydrator, in the hopes of making my own jerky. It isn't one of the fanciest machines, but it does have a top seated fan, and adjustable heat settings. With 5 trays, I can't make a full batch of jerky in one sitting, but I can easily make two batches in a day.

There are many theories about how to make jerky. First, there is the cut of meat. I have tried brisket (too tough) and flank steak (a little too fatty, and more expensive) before settling on our preferred round steak. London broil is also supposed to be a nice cut. Then, there is slicing technique - with or against the grain (or heaven forbid, ground and re-formed)? I choose mostly with the grain - I like the long strips, but still able to tear the stuff apart. Next, the seasoning. I use a marinade, however our friends, also jerky aficionadoes, use a dip method - the dip the meat in seasoning right before drying it.

So in your quest for jerky, you may have to explore some of these options.

I currently make two kinds of jerky - one that the Husband prefers, and one that I prefer. The Husband's preferred flavoring is Alton Brown's recipe (although not dried on the furnace filters). Alton's recipe is a classic jerky, but I also like a more asian flavor that really compliments the meat. This asian jerky is a little sweeter, with ginger and garlic.


Asian Beef Jerky

ingredients
1 tsp 5 spice powder
2 teaspoons crushed red pepper (or to taste)
1/2 cup soy sauce
1/4 cup honey
1/4 cup packed dark brown sugar
2 tablespoons black vinegar (or balsamic or rice wine)
1 tablespoon Worcestershire sauce
1/2 teaspoon ground black pepper
1 tbls garlic-chili paste
1 teaspoon Asian sesame oil
One 1-2 pound steak

directions

Partially freeze meat. After removing from freezer, slice meat very thin (1/4 inch) with the grain.

In a medium saucepan, combine the soy sauce with the honey, brown sugar, vinegar, Worcestershire sauce and salt and cook over low heat, stirring to dissolve the sugars. Stir in the 5 spice, crushed red pepper, garlic, ginger and sesame oil. Transfer to a medium bowl and let cool.

Pour marinade over beef (I use a big plastic bag for all of this). Marinade 6 hours to overnight. Dry meat either in food dehydrator according to directions, or in an oven on the lowest heat setting possible until dry but still pliable (somewhere between 2 and 12 hours, depending on how thick you cut the meat).


I still have jerky fantasies about the elusive venison jerky. I have tried to convince the Husband to go out and shoot me some deer, but up to this point, he has declined, citing some sort of misunderstood moral adversion to killing. I told him that I didn't care, I want venison jerky dammit. We have agreed to disagree, and I am currently still trying to find someone to barter for some venison meat.

Monday, January 21, 2008

Travel-friendly sweets...


This weekend, the family and three other couples packed up cars, and traveled over 4 hours to the snowy north for a long weekend ski trip. We rented a room with a full kitchen, because although we didn't really want to spend time cooking, we did not want to be captive to the hotel restaurants. It ended up working out brilliantly. I brought lasagna, french onion soup (with my handy kitchen torch to melt the cheese), two batches of monkey bread, and much more.

To be honest, I hadn't been skiing in about 10 years, so I was a little concerned about the possible success rate of this adventure. There was a water park for the kids, an outdoor pool that was heated so you could have the snow in your hair and a warm adult beverage in your hand and be perfectly at ease.

One of my extras for the trip were these cookies. I feared going the whole weekend without a sweet-chocolate nibble. Graham crackers or butter crackers are topped with nuts and chocolate and then lacquered in caramel-toffee. I used to make these with graham crackers (and H believes that if we are running low on toffee, the graham crackers are better), but I like the butter-salt contrast with the butter crackers. H thinks the butter crackers are good, as long as they are completely covered in toffee. Graham crackers are better when you are running low on toffee supplies because they have a little sweetness to them.

While these cookies look simple, they are addicting, as noted by my book club who also got some of these cookies.

Now, this is one of those recipes I eyeball, so forgive my vagueness. It all depends on what you like. I like my crackers with about 4-5 chocolate chips and cashews or almonds. I've also used macademia nuts. My husband prefers that every space has a nut and chocolate chip on it (the above was one of my husband's). We frequently spend more time arranging the toppings than anything else.


Toffee Cracker Cookies


Enough graham crackers / buttery rectangle crackers to fill a large cookie sheet. (usually about a 1/2 a box). I make mine on a half sheet pan. While you're at it, preheat the over to about 375.

Put a layer of aluminum foil down in the cookie sheet, and put the crackers down in a single layer (no overlaps, but as tight as you can. Break some into smaller pieces as needed).

Sprinkle the crackers with nuts and chocolate chips.

Next, make the toffee:

equal parts brown sugar and butter (no substitutions - suck it up). For 1 cookie sheet, I use about a 1/2 cup cup brown sugar, 1/2 cup butter.

Slowly, bring the butter and the sugar to a boil. Let the toffee boil for about 3-5 minutes. The sugar should be completely disolved, and it should be a coherent glob of brown stuff.

Pour this over the crackers and nuts.

Bake in the over for about 12-15 minutes. Peak at it about 10 minutes. You want the toffee to be clearly boiling over the crackers, but not burning. Take it out too early, and it may be a bit chewy (but still tasty).