Showing posts with label comfort food. Show all posts

Monday, December 29, 2014

Pasta Maker with Quick Red Sauce

My husband got me a beautiful set of Shun knives for Christmas.  Beautiful and so very sharp.  In fact, I sliced the couch accidentally while I was unwrapping them and putting them away (I may not ever hear the end of that). 

With that purchase, he got a credit back to Williams-Sonoma.  Add in the gift card I received, and we had a handy little amount to spend.  I don’t usually shop there – it’s very expensive, but I do love to walk through it. 

I had my eye on some attachments for my KitchenAid mixer – I don’t have a single attachment, and I thought it might be fun to get a pasta maker attachment.  I have a hand crank pasta maker, but it’s a pain in the ass.  I’m willing to spend a lot of time of weird cooking stuff (obsession with springerle?) but pasta – ugh.  The constant kneading and rolling and re-rolling and re-rolling before you can even cut it… And then the cleaning and picking out little bits of dried pasta for the next two weeks. It’s too much for me. 

Anyway, the lady at W-S really spoke highly of the Philips Pasta Maker as opposed the KitchenAid attachment.  I have never heard anyone gush over a product like this.   And when I did a quick check online, just about all the other reviews of it also gushed over it. 

It’s a pretty cool machine – just put in your ingredients and in 15 minutes, you have fresh pasta.  My one complaint is that it only has 4 shaping discs – spaghetti, fettuccini, penne rigate and lasagna (which can be used to make ravioli and dumplings).  Apparently, if you live in Australia or Asia, you can get udon, ramen, angel hair and a tagliatelle.  The recipe book that comes with it includes recipes for the other discs.  It’s pretty cruel, as far as I’m concerned.  I’m still considering whether it’s worth the $60 shipping fee to get a $20 part.  

Now… the fun part….  My husband arranged for an impromptu dinner party with a couple friends.  I know you aren’t supposed to try something new like this when having a party, but I figured it would be fun for everyone.   Six adults, five kids – we’d see how this thing would work.  I made a quick red sauce and a quick white sauce (wasn’t sure what the kids would eat) and grilled some sausages and a chicken breast for protein.  Bob (my starter) provided another loaf of bread and my girlfriend brought a salad.  Didn’t have time to make dessert, but we still had plenty of Christmas cookies. 

Oh. My. God.  I doubt I will ever buy pasta again.  It was perfect.  Delicious.  And done in 10 minutes.  We made two large batches of spaghetti and it was probably a little tight – I could have made a third small batch.  And I say this primarily because I woke up this morning wondering if there was any pasta left because I really really wanted some for breakfast.  But alas, we ate it all last night.

 And the topper on the thing – it was a breeze to clean.  Even I could take it apart and clean it.  No teensy tiny parts to lose.  Fantastic.

Tonight, I am going to try Food52’s Spicy Ramen Express Recipe with Harold McGee’s Alkaline Noodles (although I may cut the semolina with a bit of AP flour).  

 
Last Minute Red Sauce

Ingredients
1 large Onion Very finely diced/processed
3 tablespoon Butter
1 can (8 oz) Tomato Paste
1 can (12 oz) Tomato Sauce
1 large can Tomatoes drained
1 small can Tomatoes drained
1/2 cup Wine/water can use red or white
1 tablespoon Spices (Basil, Bay, Oregeno, parsley)
4 cloves Garlic crushed
to taste Sugar Usually pinch to 2 tbls
1/4 cup Shredded italian cheese (parmesan or a mix)
2 tablespoon Butter

 
Instructions
Saute onion in butter until very soft. Add tomato paste, tomato sauce, both jars/cans of tomatoes and wine. Break up tomatoes if whole. Add in spices if dried to taste. Let simmer for 20 minutes. If using bay leaves, take them out now. Taste sauce - may need a little sugar, depending on wine used and tomatoes and how sweet you like it. This is also the point to adjust texture - if you like your sauce smooth, stick an immersion blender in it.  Otherwise, leave it chunky.  Stir in garlic and cheese. Let simmer for as long as you need. Shortly before serving, taste again, adjust spices. Finally, stir in the last two tablespoons of butter, mix well into sauce.


Yields: 6-8 Servings


Thursday, May 14, 2009

Peanut Butter

I have been making peanut butter at home for about three years now. After Whole Foods came into our neighborhood, we fell in love with the fresh ground honey roasted peanut butter that you pay an arm and a leg for but grind it right there in the store.

It didn't take long for us to try it at home. The result was just beautiful. Slightly bumpy (a food processor can't get grind it completely smooth), fresh smelling, never separating into that oily goop like the natural stuff you buy in the store, and slightly sweetened because we still use the honey roasted peanuts.

When I mention that I make my own peanut butter, people get that glazed look on their face. You know that look: The "Oh. You're one of THOSE weirdos who sew their own clothes and raise their own chickens and don't use deodorant and sing songs around a guitar instead of watching Make Me a Supermodel like the rest of us" look. Well, I would raise my own chickens if I could, but I'm really liking Salome and the hot guy from England and I hope one of them takes it all.

The thing is, it is so.damn.easy and cheap for that matter, it doesn't make sense not to make it anymore. It lasts forever and it tastes so much better! And it takes approximately 8 minutes to make. I timed it.

So, I'm sharing my peanut butter strategy with all of you. I encourage you to run out right now and try it.

First, get yourself a big ole can of honey roasted peanuts. You can use plain roasted peanuts, but DO NOT use dry roasted. I'm not sure why, but they are not as oily and do not develop the butter texture. No matter how long I ground them, I ended up with just crumbly peanuts. I now go to one of those wholesale stores and just buy a case of the huge tubs of peanuts so we don't have to worry about running out.

Add those peanuts to your food processor, about 1/2 to 3/4 the way up the bowl.

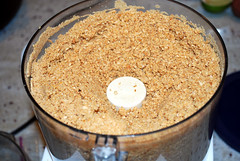
Next, start the processing/chopping of those peanuts. At first, your peanuts will look like, well, chopped peanuts.

pb1


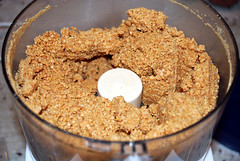
Keep the processor running. At the next stage, your peanuts will start to clump together. They are starting to extrude oil, and you'll notice that there are little clumps at the bottom of the processor, and it may even clump around the top. This is a good time to get a spoon and start breaking it up a bit. Keep processing.

pb2

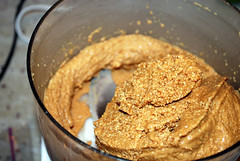
The next stage is when the peanut butter is really starting to come together. There will be some areas that look like peanut butter, but it's still really chunky. Stir it up a bit again, and keep processing.

pb3

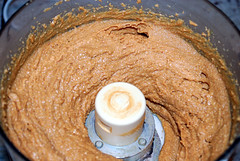
About another minute or so into the processing, and it's really going to start looking like peanut butter. You're going to look at it, taste it, and cry out with pure joy and consider all the things you could do with this sticky elixer from the gods. But don't stop now. The picture below really looks like peanut butter, but I strongly encourage you to keep processing for about 2 more minutes. If you stop now, the peanut butter may firm up substantially in the fridge (which is where I keep it, just to be safe) making it nearly impossible to spread on that squishy white bread your child so desires. Trust me. Let it go. Stir it up again. Process for about another 2 minutes.

pb4


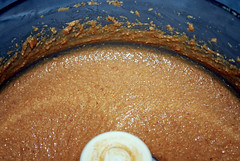
Finally, your peanut butter should look like this:

pb5

See how it's no longer holding a line? You may think it looks a little runny, but once it is away from the heat of the food processor, it will firm up. It's done now.

Finally, give a taste to your child who has been begging for some peanut butter since you started making it.

pb6

And there you have it. I was told as a child that eating peanut butter alone was one of the most dangerous things you could do since the Heimlich doesn't work on peanut butter. So please don't turn me in to Child Services.

Sunday, August 17, 2008

Back to school sandwiches...

I love back to school time. I love school supplies. I love the (idea of) organizing and re-organizing. More than New Year's, the beginning of school signifies to me a fresh start. A new school year, new teachers, new things to learn, new pens... ahhh... it just rejuvenates me.

Except this is the first year it is totally vicarious. This is my first post-graduation-no-school-in-sight-for-me autumn. Bummer. I keep looking longingly at the school supplies and dorm organizers.

The Marvelous Miss Thing starts school this week. First grade. Big time. Her school does not offer cafeteria services, with the exception of the importing of fast food every day. I'm not real excited about that prospect, and quite honestly Miss Thing isn't a huge fast food fan. She likes a hamburger, but isn't thrilled with pizza and has some sort of recessive gene that makes her not.like.french.fries *gasp*. Clearly, not my good Irish Catholic genes in which we ate potatoes with every meal, and french fries were the top of the potato "yum" chart.

I have been trying to come up with more nutritious yet convenient and portable lunches. The one thing she begged for at the store were those little round pre-cut frozen peanut butter and jelly sandwiches. Well, looking at the price, I figured I could make those puppies at half the cost, plus, by using my homemade peanut butter and jelly, I was cutting down on all that other crap they put in it.

Two squishy white pieces of bread (I let the bread slide. I'm not going to use good bread for this project) cut out with a water chestnut can. Peanut butter on both sides. A spoonful of jelly in the center. (It helps if you kind of squish the bread a little bit)
Seal the two slices of bread with the tines of a fork and pop in the freezer. Puffy white PB&Js. They defrost easily. Heck, Miss Thing eats them frozen.


I felt like a super genius after this little project.

Sunday, February 3, 2008

Pot-sticker soup


There are times when only soup will do. Maybe it is the weather, maybe it is because one imbibed one too many hurricanes at a certain Mardi Gras party the night before, but today both myself and Mr. H needed soup. Needed. Soup. Now

For us, today was a potsticker soup day. Clear broth seasoned with soy sauce and green onions, poured over potstickers and made as spicy as one could take. We fell in love with potstickers and buy them in bulk. They are an essential part of crap dinner. I have made my own potstickers, but they do not hold up well in the freezer, and they really fall apart when in soup, so I generally just stick with the pre-made ones.

Potstickers are little dumplings wrapped in a won-ton like dough that is then steamed and/or fried. When we are eating them as a meal (which we have done on several occasions), we boil them, then pan fry them. Which you can also do for this soup, because it gives them a nice crispy edge, but neither of us was feeling up to that much work.


Potsticker soup

8 cups chicken broth (I would have used my homemade stock, but I had used the rest on french onion soup *sigh*)
4-6 tbls soy sauce (to taste)
1-2 tbls rice wine vinegar (again, to taste - I like mine sour)
1 clove garlic, crushed (A small spoonful of garlic-ginger paste is also lovely)
splash sesame oil
(additional possible soup additions, based on what you have, and your tastes - 1-3 thinly sliced green onions, a couple thinly sliced button mushrooms, a little tofu, a handful of frozen green peas)

Mix together, and let simmer.

Meanwhile, prepare potstickers according to directions and your wishes.

Finally, plate the soup. Place 1 to 2 potstickers in a bowl. Pour broth over potstickers (this is important - you do not want to put the potstickers into your pot of broth - the wrapper will fall apart and lose all its dumpling-ness).

Top with whatever you have in the house - more green onions, bean sprouts, as much hot chili paste as you can handle